Categories
How to make Instagram Stories
7 minute read

An Instagram Story is a little different to an Instagram post. Stories only last for 24 hours and don’t appear in your feed, giving you the chance to be a little more fun and playful.
You can also save your Instagram Story posts to Highlights, which appear on your profile page like a digital scrapbook.
Here’s how to turn your Instagram Stories into something your followers will love.
How to make a standard Instagram Story
Step 1: Open Instagram
There are two ways to start posting an Instagram Story. You can either tap the blue ‘add’ button over your profile picture, or you can tap the add button at the bottom of your screen and switch to the ‘Story’ tab.
Step 2: Choose your picture
If you already have a picture or video you want to use for your Story, you can select it from your camera roll. Otherwise, you can take a new one using the Instagram camera.
Step 3: Add text
You can add all sorts of things to your Instagram Story, which we’ll teach you how to do later. But for now, let’s add some simple text.
Tap the text button at the top of your screen to type your caption. You’ll be able to pick from several different fonts, depending on what look you’re going for. You can also change the colour of your text and the spacing of the words.
By zooming in or out on the text, you can also change the size of the caption, and you can drag it wherever you want, so it doesn’t cover the best bits of your picture.
How to make an Instagram Story with effects
<<>>@giffgaff Learn how to create Instagram stories with effects using your mobile phone 📱 #Techtips #Instagram #MobilePhoneTips #Techtok #InstagramStories
♬ snowfall - Øneheart & reidenshi
Follow these simple steps to make an Instagram Story with effects.
You don’t just have to have a regular photo for your Instagram Story. You can change the layout and add effects too.
Step 1: Pick a layout
When you open the Story option, there’s a button on the left-hand side of your screen that will let you pick a grid layout for your photos. There’s plenty to choose from, so all you need to do is pick the one that’s right for your post.
Step 2: Add your photos
Once you’ve picked your layout, swipe up to select photos from your camera roll. You’ll have to do this for as many spaces as there are in the layout you’ve chosen. Just tap the tick button after you’ve picked your photos and you’re ready to move on to the next step.
Step 3: Add some effects
You can find the effects tab on the top right of your screen. Instagram has a huge variety of effects you can choose from. You can add filters to your Story, animate it and there are tons of other cool effects.
Step 4: Adding multiple layers
If you want to add more than one effect of the same type, you’ll need to save your edited Story to your camera roll without posting it and use it as a new Story post to add another effect.
How to add a location
If you’re out to dinner at a nice restaurant, or on holiday somewhere hot and sunny, you might want to add your location to your Story to let people know where you are.
Step 1: Take a picture
To show off your location, you’ll want to take the best picture you can. You can even add a couple of effects to make your photo stand out.
Step 2: Add your location
Tap the sticker icon on the top right-hand side of your screen. Options to tag people, add music and other things will pop up, so just select the ‘Location’ option.
Depending on where you are (i.e. in a busy city centre), multiple places may come up as your location. You can either scroll to find the right place or use the search bar to find what you’re looking for.
You can position your location wherever you want on your Story and make it any size you like.
How to tag people
If you’re out with friends and family, you’ll want to post about it. When you tag someone in your story, it will notify them and give them the option to repost it onto their own story.
Step 1: Pick your photo
If you’re posting pics of yourself and your loved ones, you’ll want to make sure you all look the best you’ve ever looked.
Step 2: Start tagging people
Tap the sticker icon in the top right-hand side of your screen, the same as you would if you were adding a location. Tap the ‘@mention’ icon and get tagging; you can tag as many people as you like.
You can also move their names wherever you want on your Story, in a neat little list or on top of each person you’ve tagged; it’s up to you!
How to add music
Sometimes a little bit of music can give your Story that extra spice.
Step 1: Choose what you’re going to post
Choose whatever photo you want. Or, if you’re feeling a little adventurous, use a video. If you’re worried about the sound from the video clashing with the music you pick, mute the video and you’ll be ready to go.
Step 2: Select your song
Tap the music note in the top right-hand side of your screen to begin your song selection. Instagram doesn’t have every song, but even if they don’t have the exact song you’re after, you’ll still find one you like.
Step 3: Edit your song
You can only choose up to 15 seconds of a song, so you’d best make it a good one.
You can select anywhere from 5 to 15 seconds of a song by sliding the selection bar along until you find the part of the song you want.
You’ll then be able to choose how you want the song to appear in your Story. You can have lyrics appear in time with the song (you get to pick the font and colour), you can have the audio only, or you can have the album artwork on your Story along with whatever you’re posting.
As with everything you post on your Story, you’ll be able to decide the size and placement of the artwork and/or lyrics.
How to make your Stories interactive
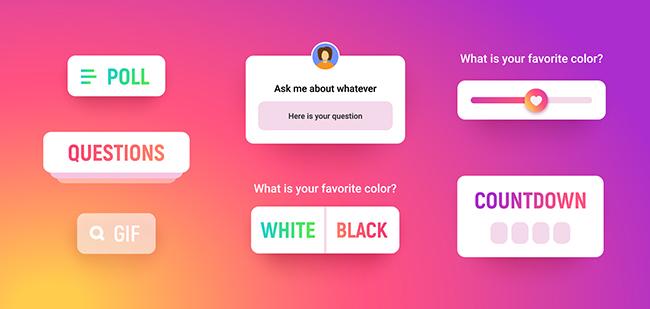
Did you know, you can use your Stories to engage with friends, ask questions and even get their opinions?
Simply click the Stickers button in the top right of your Story to find the huge array of options available.

From adding links to your favourite articles, to starting a countdown or creating quizzes for your followers. Interactive Stickers are a great way to start conversations and connect with the people you don’t get to see every day.
How to share with close friends
If you want to set your Story so only certain people can see what you’re up to, setting up your Close Friends is the way to do it.
Go to Settings & Privacy > Close friends and you’ll be able to select all the people you want on your close friends list.
To post to only your close friends, when you’ve got your Story ready hit ‘Close Friends’ at the bottom of the screen instead of ‘Your Story’. You can tell if it’s worked because the coloured ring around your icon will be green instead of the normal blend of colours.
Look at you, you’re an Instagram whiz! Now all you need is a decent camera phone to snap the best selfies. These are the best selfie camera phones available through giffgaff.
And if you’re still not satisfied with your shot, why not try out these free photo editing apps? You’ll be a professional Instagrammer in no time.


