Categories
How to manage multiple Apple IDs
4 minute read
Your Apple ID is your gateway to making purchases on the App or Mac store, signing into iCloud and using Find My iPhone. So, it’s a pretty important part of having an Apple device.
Whenever you setup an Apple device, you’re asked to sign in with your existing Apple ID or create a new one. Some of you may have decided to go down the new route, which is more on the complex side because it means your purchases will be linked to that ID only and will not be accessible when you’re signed into another Apple ID account. If you’re reading this and thinking oops, what have I done? Keep reading.

Merging multiple Apple ID accounts
The bad news is that there’s no way for you to merge multiple Apple ID accounts into a single one, which means all the purchases you’ve ever made across all your accounts aren’t always going to be accessible. So, how do you access them you’re wondering? Well, you’ve got two options really.
The first option is to continue using multiple accounts on a single device. This is quickly going to become somewhat annoying, as it means you’ll need to sign in to one account to access apps purchased with that account and sign out and back in with your other ID to access different apps purchased there. It’s not ideal but it’s an option nevertheless.
Option two is to forget about all your other accounts and stick to using just one here-on. This will mean losing access to apps purchased on those accounts though but if you’re not prepared to lose them then you may want to consider purchasing them again on your main account but you probably don’t want to be paying for those apps a second time, right? I thought so but I’ve got your back. Well, Apple do really.
Use the Family Sharing feature to manage multiple Apple ID accounts
Apple cleverly introduced a Family Sharing feature that lets you add multiple Apple IDs under one parental account. So, while it’s aimed at family members, you can totally use it on your own with up to five Apple IDs. This is perfect because it means all purchases made across all accounts are accessible, eliminating the need to constantly sign in and out of accounts. This way, you can download all of your old apps to your new account. Convenient, right? Read on to find out how to set it up.

How to set up Family Sharing
Before you begin, make sure you’re signed into iCloud with your main Apple ID account.
-
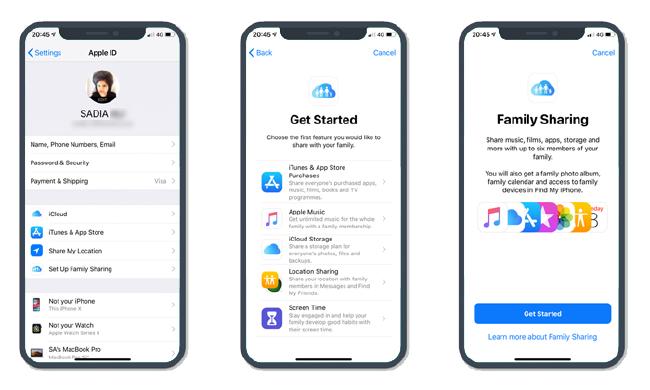
Go to Settings > Tap your name>
-
Tap Set Up Family Sharing
-
Hit Get Started
-
Choose iTunes & App Store purchasesfrom the options displayed
-
Confirm the account. If it’s showing one of your old accounts then click Use a Different Account and sign in with your main one. If it’s showing the correct account then click Continue
-
You will then see the Shared Payment screen. Make sure the payment method displayed is how you want to pay for future purchases. If it’s correct, hit Continueotherwise click Use Different Payment Method
-
Finally, go ahead and ‘invite family members’, which will essentially be yourself. Send the invitation then use each of your accounts to access that link and join the ‘Family group’
That’s it. Now all your Apple IDs are essentially under a single account.
Thoughts
I guess it’s time to take a moment and appreciate Apple’s Family Sharing feature. Without it, we’d be unable to manage multiple Apple IDs easily and would have to resort to constantly signing in and out with the various accounts or have to sacrifice some purchases. The former is just downright inconvenient and the latter is not something anyone wants to do, after all you paid good money for those apps.
With Family Sharing, those worries are non-existent, which is great. Oh and while we’re taking that moment to appreciate Family Sharing, let’s also take a moment to remind ourselves that creating multiple IDs is not a good idea. Stick to one, just to make life that little bit more simple ;)


